

After purchasing a QoderWork CN or Qoder CN CLI subscription, enterprise administrators can use email invitations to add members to their organization in bulk. Invited members receive an email containing an invitation code and a registration link. After registering and setting an initial password, they can sign in and start using the service.
Administrators can send invitations to multiple corporate email addresses at once from the Qoder CN website.
The overall process is as follows.
In the organization console, open Members > All members, click Add members, and select Email invitation. If your version provides Settings > Access & Authentication > Member Configuration > Email Invitation, open the invitation settings there.
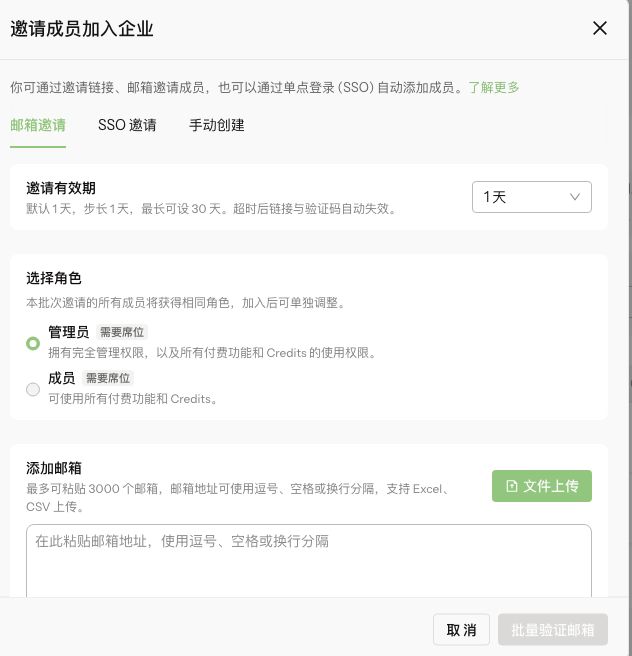 This test-environment example highlights validity, roles, and addresses. Available durations, roles, and batch limits may differ by version; check your current dialog.
After sending, open Members > Email invitation to check invitation status and validity. Once a member accepts, check their role and seat under All members. Successful email validation does not mean an invitation was sent or a member has joined.
Invited members will receive an email from
Open the email and click the Join Organization button. Your browser will open the Qoder CN "Join Organization" page. Your email address is pre-filled.
Tip: If the button does not work (for example, on a different device or if blocked by your email client), you can manually copy the link from the email, open it in your browser, and use the 6-digit invitation code from the email to complete the verification.
On the "Join Organization" page, complete the following steps:
After registration, members can sign in to Qoder CN through the following methods:
Q1: How long does it take for the invitation email to arrive? What should I do if a member does not receive it?
Invitation emails are typically delivered within one minute. If a member has not received the email after five minutes, try these steps:
How it works
Administrators can send invitations to multiple corporate email addresses at once from the Qoder CN website.
The overall process is as follows.
Prerequisites
- You have purchased a QoderWork CN / Qoder CN CLI Enterprise Standard (Teams) subscription, you are an administrator for the organization, and you have sufficient available seats.
Step 1: Send invitations
Open the invitation dialog
In the organization console, open Members > All members, click Add members, and select Email invitation. If your version provides Settings > Access & Authentication > Member Configuration > Email Invitation, open the invitation settings there.
Check settings and email addresses
- Check the Invitation validity period. Expired links and codes must be resent; use the durations offered in the current dialog.
- Select a role. All invitations in the batch use the same role, which can be changed after joining. Admins and Members require seats; see Members and roles.
- Enter addresses under Add emails, using the paste or import options offered by the current dialog. Check its batch size limit.
- Review addresses, roles, and available seats. If 批量验证邮箱 (Validate emails in bulk) is shown, complete validation before confirming the send. In a multi-step wizard, complete settings and address entry in sequence.
Check invitation results
After sending, open Members > Email invitation to check invitation status and validity. Once a member accepts, check their role and seat under All members. Successful email validation does not mean an invitation was sent or a member has joined.
Step 2: Accept the invitation and register
Invited members will receive an email from noreply@qoder.cn with an invitation to join the organization.
Open the registration link
Open the email and click the Join Organization button. Your browser will open the Qoder CN "Join Organization" page. Your email address is pre-filled.
Tip: If the button does not work (for example, on a different device or if blocked by your email client), you can manually copy the link from the email, open it in your browser, and use the 6-digit invitation code from the email to complete the verification.
Enter invitation code and set password
On the "Join Organization" page, complete the following steps:
- Invitation Code: Paste or enter the 6-digit invitation code from the email. This is usually pre-filled if you clicked the link in the email.
- Set Password: Passwords must be at least 8 characters long and contain uppercase letters, lowercase letters, and numbers. For added security, we recommend including symbols.
- Confirm Password: Re-enter your password.
- Select the I have read and agree to the Terms of Service and Privacy Policy checkbox.
- Click Join Organization and Complete Registration.
The invitation code expires according to the validity period selected by the administrator. If it expires or the invitation is revoked, contact the administrator to have it resent.
Step 3: Sign in and use the service
After registration, members can sign in to Qoder CN through the following methods:
- Website: Go to
qoder.cnand sign in with your registered email and the password you set during registration. - IDE plugin / client: At the login prompt, select Sign in with Qoder CN Account and enter the same email and password.
FAQ
Q1: How long does it take for the invitation email to arrive? What should I do if a member does not receive it?
Invitation emails are typically delivered within one minute. If a member has not received the email after five minutes, try these steps:
- Check their spam folder.
- Confirm that the corporate email gateway is not blocking emails from
noreply@qoder.cn. - As the administrator, go to the Member Management > Pending tab and click Resend Invitation.
- If the member still does not receive the email after you resend it, contact Qoder CN support to check the email delivery status. After the issue is resolved, send a new invitation.