

Applicable plans: Teams, Enterprise
Overview
Single sign-on (SSO) lets your organization's members authenticate with your corporate identity provider (IdP) without needing separate Qoder credentials. Qoder supports two mainstream SSO protocols:
- SAML 2.0: A mature, XML-based enterprise authentication standard, widely used by IdPs such as Okta, Microsoft Entra ID (formerly Azure AD), OneLogin, and Alibaba Cloud IDaaS.
- OIDC (OpenID Connect): A modern identity protocol built on OAuth 2.0 with one-click endpoint auto-discovery via a Discovery URL. Typical providers include Okta, Azure AD, Google Workspace, Auth0, Authing, and Alibaba Cloud RAM.
Benefits of SSO
- Enhanced security: Centralize authentication through your corporate identity provider.
- Improved user experience: Access all enterprise applications with a single set of credentials.
- Simplified user management: Users from verified domains are automatically provisioned and added to your organization on first sign-in.
How to choose a protocol
| Protocol | Use case |
|---|---|
| SAML | Your IdP only supports SAML; you need IdP-initiated SSO; or you have an existing SAML-based enterprise authentication system. |
| OIDC | Your IdP supports OIDC or OAuth 2.0; you want auto-discovery via a Discovery URL; or you prefer a lightweight JSON-based integration. |
Prerequisites
Before configuring SSO, make sure you have the following:
- Administrator permissions: You are an administrator of the organization.
- Identity provider permissions: You can create and configure applications in your organization's IdP.
- DNS access: You can add a TXT record to your organization's email domain for verification.
Configuration process
Regardless of whether you choose SAML or OIDC, the SSO configuration process includes the following steps: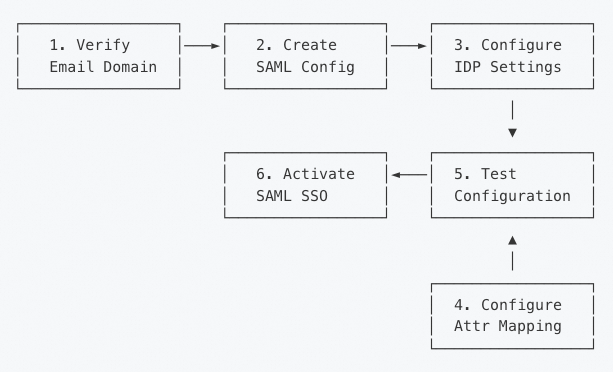
Step 1: Verify your email domain
Before configuring SSO, verify ownership of your company's email domain so that only users from a verified company domain can sign in through your organization's SSO. For instructions, see Domain verification.
Step 2: Create an SSO configuration
- As an administrator, go to Organization Settings > Security & Identity.
- Select SAML Settings or OIDC Settings depending on your IdP.
- SAML
- OIDC
Create a SAML configuration for your organization. Qoder automatically generates the SP certificate and private key. After initialization, Qoder generates the following information for later use when configuring your IdP:
- SP Entity ID
- SP Metadata URL
- SP ACS (Assertion Consumer Service) URL
- SP Certificate and Private Key
| Field | Example value |
|---|---|
| SP Entity ID | https://qoder.cn/saml/metadata/{org_id} |
| SP Metadata URL | https://qoder.cn/saml/metadata/{org_id} |
| SP ACS URL | https://qoder.cn/sso/callback/saml/{org_id} |
Step 3: Configure the identity provider (IdP)
- SAML
- OIDC
You can configure your SAML IdP in two ways:
Method A: Automatic configuration (recommended)
Use this method if your IdP provides a metadata URL:- On the SAML Settings page, find the IDP Metadata Configuration (Identity Provider Metadata Configuration) section.
- Select the Metadata URL (Import from URL) configuration mode.
- Enter your IdP metadata URL (for example,
https://your-idp.example.com/app/metadata). - Click Save.
- IDP Entity ID
- SSO URL
- Signing certificate
Method B: Manual configuration
Use this method if your IdP does not provide a metadata URL:- On the SAML Settings page, select Manual Configuration mode.
- Fill in the following fields:
- IDP Entity ID: The entity identifier of your identity provider.
- IDP SSO URL: The SSO sign-in endpoint URL.
- IDP Public Certificate: The PEM-formatted signing certificate (optional, but recommended).
- Click Save.
Step 4: Configure attribute mapping
- SAML
- OIDC
You can configure your SAML IdP in two ways:
Method A: Automatic configuration (recommended)
Use this method if your IdP provides a metadata URL:- On the SAML Settings page, find the IDP Metadata Configuration (Identity Provider Metadata Configuration) section.
- Select the Metadata URL (Import from URL) configuration mode.
- Enter your IdP metadata URL (for example,
https://your-idp.example.com/app/metadata). - Click Save.
- IDP Entity ID
- SSO URL
- Signing certificate
Method B: Manual configuration
Use this method if your IdP does not provide a metadata URL:- On the SAML Settings page, select Manual Configuration mode.
- Fill in the following fields:
- IDP Entity ID: The entity identifier of your identity provider.
- IDP SSO URL: The SSO sign-in endpoint URL.
- IDP Public Certificate: The PEM-formatted signing certificate (optional, but recommended).
- Click Save.
Step 5: Test the configuration
Test the SSO configuration before enabling it to make sure everything is set up correctly:
- On the SSO Configuration page, click Test SSO.
- The system runs a series of validation checks (certificates and signatures, metadata endpoints, discovery document, attribute mapping, and so on).
- Review the test results.
Step 6: Enable SSO
After all tests pass, you can enable SSO:
- On the SSO Configuration page, make sure all validation checks have passed.
- Turn on the Enable SSO toggle.
- Confirm the details in the dialog and activate.
- The SSO status changes to Active.
- Members can now sign in using SAML or OIDC SSO.
- Users with an email address in a verified domain are automatically redirected to your organization's SSO sign-in after entering their email on the login page.