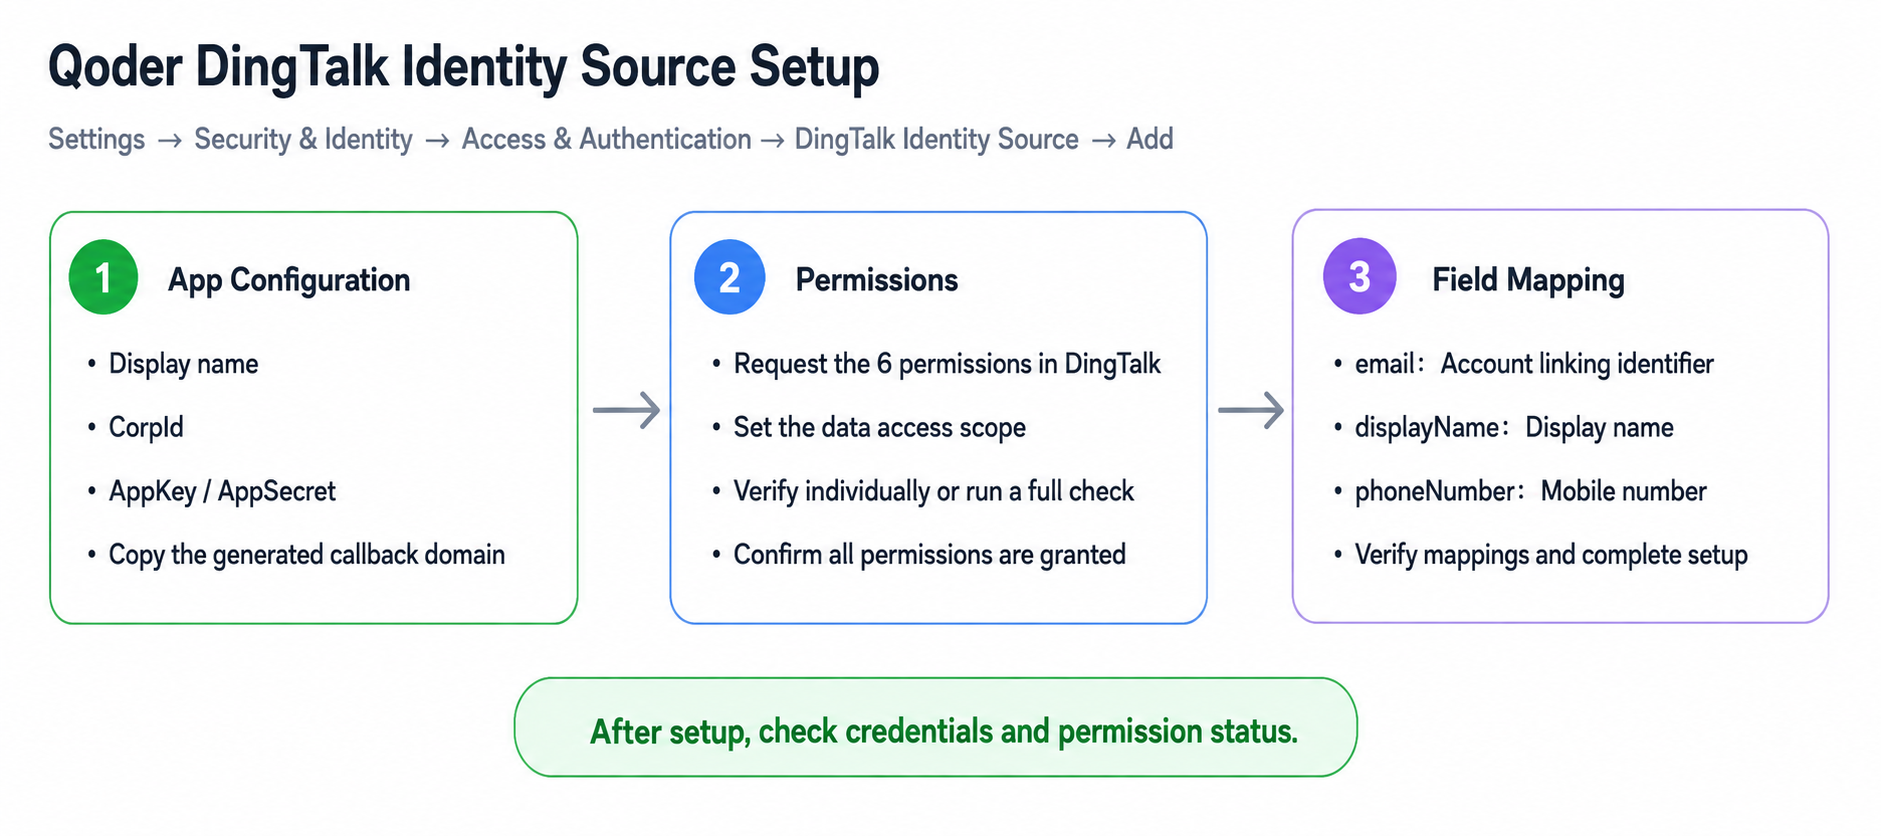
Connect your enterprise directory through a DingTalk internal enterprise app and configure credentials, permissions, and field mappings.
A DingTalk identity source connects your enterprise directory to Qoder through a DingTalk internal enterprise app (first-party app). Qoder uses the configured field mappings to identify members and departments in DingTalk.This guide is for administrators responsible for Qoder identity management and DingTalk app configuration. Before you begin, make sure you have Qoder administrative permissions and permission to view and configure the target DingTalk internal enterprise app.
A DingTalk identity source synchronizes identity directory data. It is separate from SAML or OIDC single sign-on configuration.
Confirm that you can sign in to the DingTalk Developer Console and create an internal enterprise app for your organization.
Confirm that you can access the enterprise CorpId and the app's AppKey and AppSecret.
Confirm that you can request address book permissions and configure their scope. If different administrators handle app creation and permission requests, coordinate with them in advance.
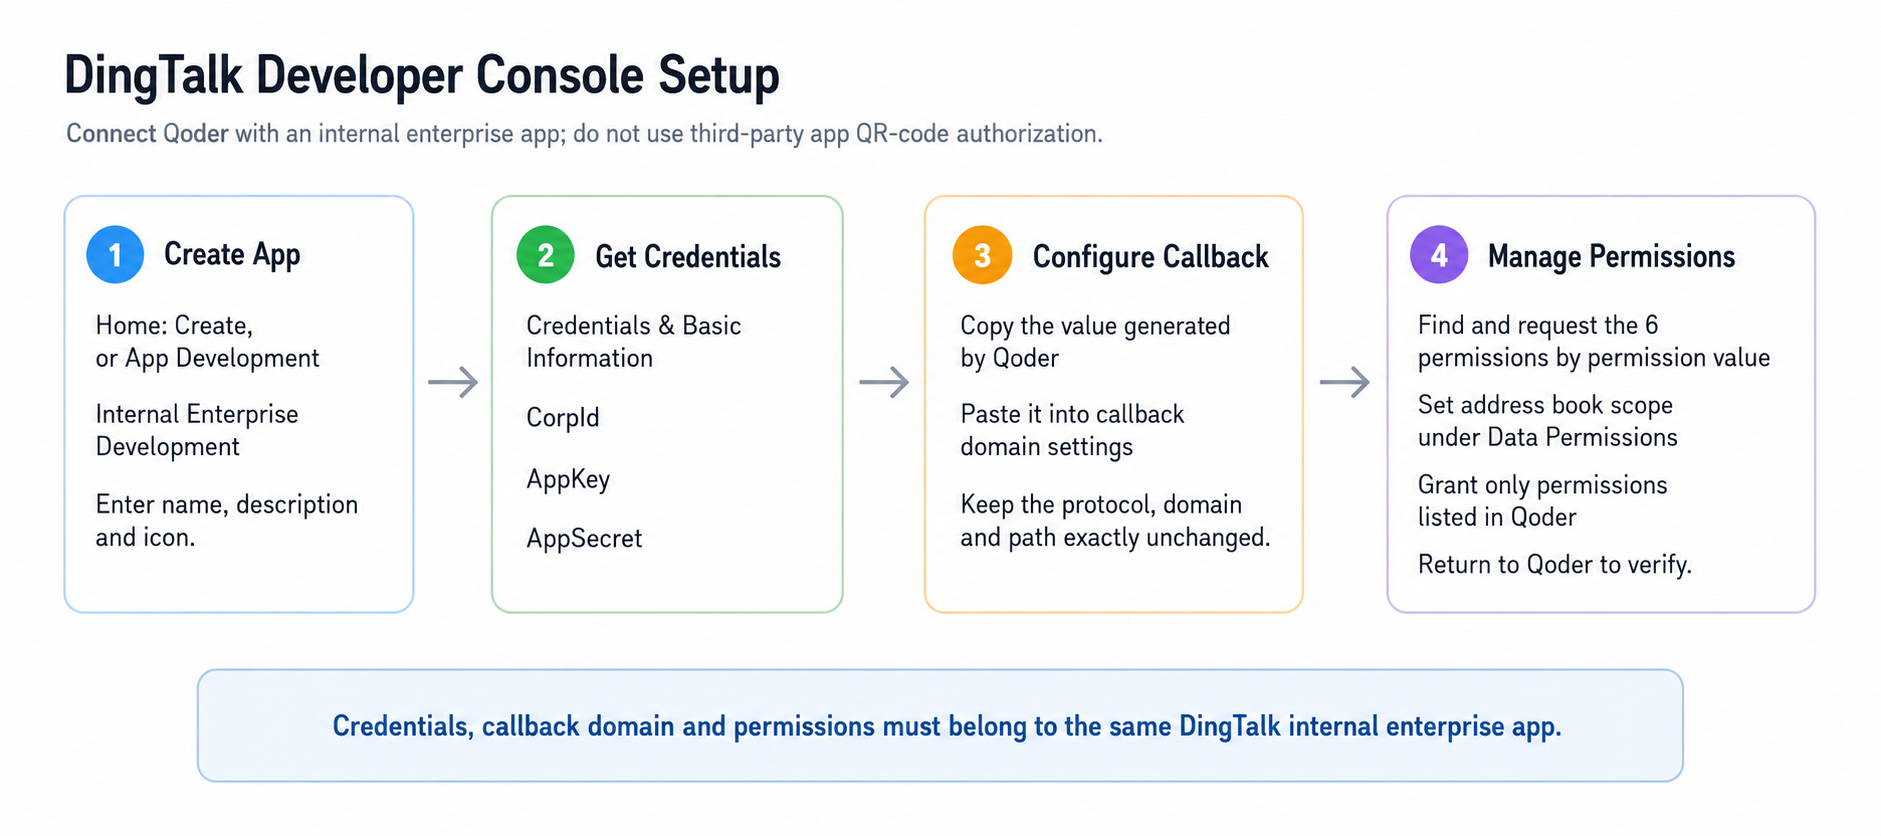
DingTalk supports several integration methods, including QR-code authorization for third-party apps and internal enterprise app integration. This guide covers DingTalk (first-party app) in Qoder. An administrator must create an internal enterprise app in DingTalk and manually configure credentials and permissions. It does not use the third-party app QR-code authorization flow.
Click Create in the app development guide on the console home page, or open App Development from the top navigation to create an internal enterprise app.
Go to App Development > Internal Enterprise Development.
Click Add App.
Enter the app name, description, icon, and other required information, then create the app.
Open the app details page.
The app name identifies the app in DingTalk. You can use the same name as the identity source's display name in Qoder. Do not create a third-party enterprise app: its credentials cannot be used for the first-party integration described here.
The identity source's name in Qoder, used to distinguish it from other sources. For example, “DingTalk Enterprise Directory.”
CorpId
Yes
The current DingTalk enterprise's ID.
AppKey
Yes
The DingTalk internal enterprise app's identifier.
AppSecret
Yes
The secret paired with AppKey. Its value is hidden by default and can be temporarily revealed when needed.
The page also generates a callback domain:
Address
Configuration
Callback domain
Copy the value generated on the page into the app's callback domain configuration in DingTalk.
Always copy the complete address generated by your current Qoder page. Do not use example domains from this guide, screenshots, or demo environments, and do not alter the protocol, domain, port, or path.
Keep the Qoder configuration page open and complete these steps in the DingTalk app details:
Copy the Callback domain displayed in Qoder.
Paste it into the DingTalk app's callback domain configuration.
Save the DingTalk app configuration.
Return to Qoder and click Next. If the display name, CorpId, AppKey, or AppSecret is empty, the page highlights the missing fields. Fill them in to continue.
The identity source needs to read member and department information. In DingTalk, go to App Development > Select App > Permission Management, then search for and request these 6 permissions:
Permission
Permission value
Purpose
Enterprise employee mobile phone information
fieldMobile
Read members' mobile phone numbers.
Email and other personal information
fieldEmail
Read members' email addresses.
Basic address book information
qyapi_get_department_list
Read department lists and other basic directory information.
Department member read access
qyapi_get_department_member
Read membership relationships between departments and members.
Member information read access
qyapi_get_member
Read member information.
Address book personal information read access
Contact.User.Read
Read personal information in the address book.
Complete authorization in DingTalk:
Click Permission Management on the app details page.
Search for each permission using its permission value from the table.
Select the permissions and submit the request. If the page supports batch requests, you can submit several at once.
Under Permission Management > Data Permissions, set the address book scope the app can access. Select all employees to synchronize the complete directory, or select only the members you need to connect to Qoder.
Complete authorization and wait for the permissions to take effect in DingTalk.
The permission scope determines which members and departments the app can read, and therefore limits the directory data Qoder can obtain. To change the scope later, update the app's permission or visibility scope in DingTalk, then return to Qoder and check again.
Request only the permissions listed in Qoder. Do not select all permissions unrelated to the integration.
After requesting permissions, return to Qoder:
Click Verify Permission next to a permission to check it individually.
Click Full Check to check all 6 permissions at once.
If a permission is Not Authorized, confirm in DingTalk that it has been requested and has taken effect, then verify it again.
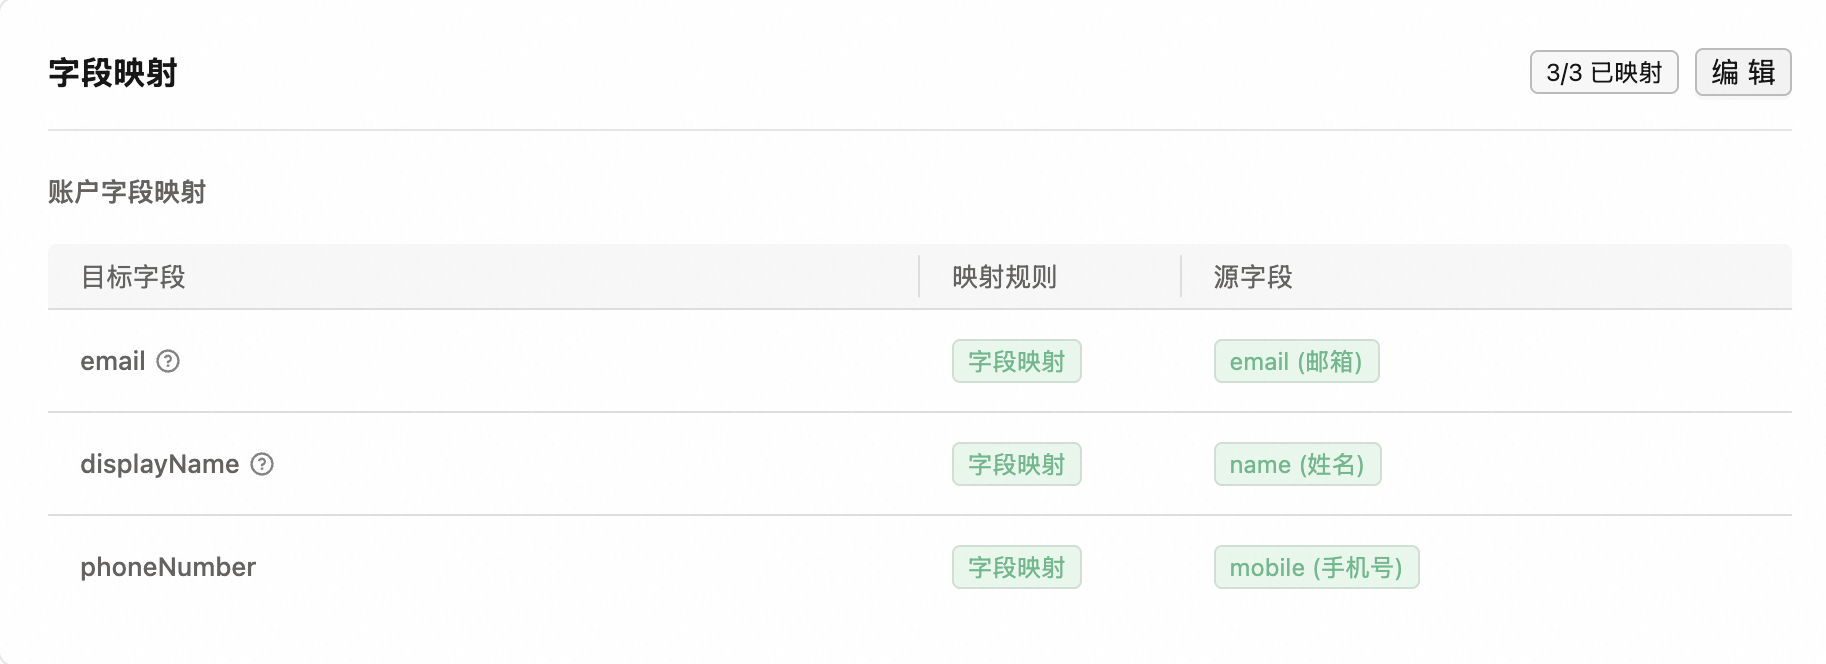
Field mappings determine which Qoder identity fields receive DingTalk member attributes. Configure these 3 account fields:
Qoder field
Attribute path
DingTalk field
Configuration
email
user.email
email (email) or org_email (enterprise email)
Required as the unique identifier for account linking.
displayName
user.displayName
Select according to your organization's needs.
Determines the member's display name in Qoder.
phoneNumber
user.phoneNumber
mobile (mobile phone number)
Synchronizes the member's mobile phone number.
Both email and org_email can map to Qoder's email field, but they have different sources:
email: The email address in the member's DingTalk profile.
org_email: The member's enterprise email address in the current DingTalk enterprise.
Choose the field that reliably matches members' Qoder account email addresses. If your organization centrally maintains enterprise email addresses and target members have valid, complete org_email values, you can use org_email; otherwise, use email. If both exist but differ, choose the field matching the member's Qoder account email to avoid duplicate accounts or incorrect account associations.When configuring mappings:
Email is the account identifier required for the integration. The selected DingTalk field must provide a valid email address for each member you need to connect.
Before completing setup, check members from different departments and member types to confirm that the selected email field is populated.
Changing or removing a mapping changes how future data from the source is written to Qoder. Before saving, confirm that it will not cause missing member information or incorrect associations.
Click Complete Setup. Qoder opens the identity source details page and checks the app credentials and authorization status.
When you open the identity source details page, Qoder automatically checks AppKey, AppSecret, and the granted permissions.
A normal configuration status means the credentials and permissions are valid in the current check.
If Qoder detects a change to the authorization scope in DingTalk, it warns that the local configuration may no longer be valid. Correct the DingTalk configuration, then click Check Again.
After dismissing the automatic notification, you can still click Check Again under Authorization to see each permission's status and the number granted.
Under App Credentials, click Check Pairing to check whether the current AppKey and AppSecret match.
Permission verification checks whether Qoder can currently use the corresponding permission. If DingTalk shows that it has been requested but Qoder reports it as unauthorized, confirm that you configured the same internal enterprise app and that the permission has taken effect.
CorpId identifies the connected DingTalk enterprise on the details page. You can update AppKey and AppSecret separately.
Edit AppKey or AppSecret.
Click Save next to the field.
Click Check and Save in the confirmation dialog.
Wait for the system to verify that the new value matches its paired credential.
If validation succeeds, the new credential is saved and takes effect immediately. If validation fails, the change is not saved. Confirm that AppKey and AppSecret belong to the same DingTalk app, then check again.
The mapping section shows mapping identifiers, the number of mapped fields, and the DingTalk field associated with each Qoder field. After editing mappings, confirm that the email identifier is still valid and all 3 account fields are complete.
The callback domain is in the collapsed Callback & Advanced Configuration section. The domain configured in DingTalk must match the value currently displayed in Qoder.
The details page shows the current connection status and controls to enable or disable the source. After a status change, the page displays Enabled or Disabled. After re-enabling the source, check credential pairing and authorization to confirm that the configuration remains valid.
Clicking Delete Identity Source and confirming permanently removes the following information from that source:
App credentials
Permission configuration
Field mappings
Synchronized data
Deletion cannot be undone. To restore the integration afterward, you must add and configure the identity source again. Before deleting it, confirm that the source and its synchronized data are no longer needed.
Common causes include an AppKey and AppSecret from different internal enterprise apps, or missing characters when copying. Obtain the credentials again from the same DingTalk app, without adding leading or trailing spaces.
email comes from the member's profile; org_email comes from the current DingTalk enterprise. Select the field that consistently provides valid values for target members and matches their Qoder account email addresses. Before completing setup, sample different departments and member types to avoid missing account-linking email addresses.
What should I do after changing DingTalk permissions?
Return to the identity source details page and click Check Again under Authorization. If Qoder reports configuration changes, correct the permissions in DingTalk and check again until all required permissions are authorized.


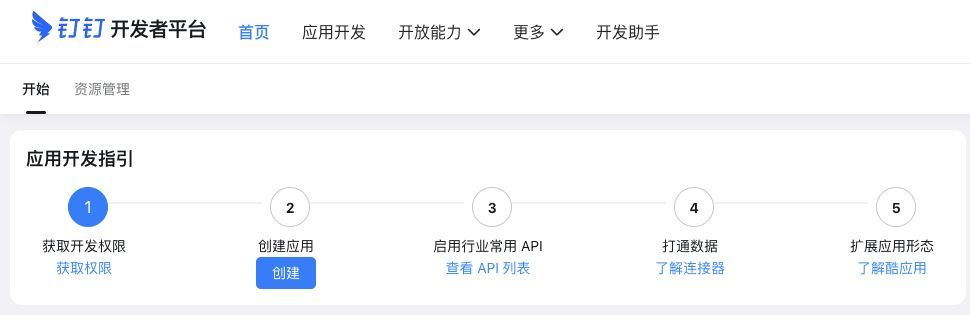 Click Create in the app development guide on the console home page, or open App Development from the top navigation to create an internal enterprise app.