

Trigger a Waker or WakerFlow by schedule, event, or API and manage limits, run records, and failures.
Autonomous Work starts a task automatically after its behavior has been validated. A task can run one Waker or a WakerFlow. Work that still requires frequent clarification or step-by-step judgment should remain a chat task.
Autonomous Work owns when work starts, what input it receives, and when it stops. WakerFlow owns the stages and role handoffs after a run starts. See WakerFlow for workflow design and diagnosis.
Path: left navigation → Autonomous Work. The page summarizes total tasks, active tasks, and tasks handled by Wakers or WakerFlows. Filter by response type, trigger type, and status.
From a Waker detail page, Work → Autonomous Work shows only tasks related to that Waker. A completed run only means execution ended; inspect the run input, process, result, and artifact before acceptance.

An autonomous task normally runs without a person present to add missing context. Check the following before creating one:
Prefer one trigger source for one business change. If event delivery and polling cover the same object, add a stable deduplication key in the task or caller.
For code, file, or external-system writes, include test requirements, target branch, output location, and actions that require human approval.
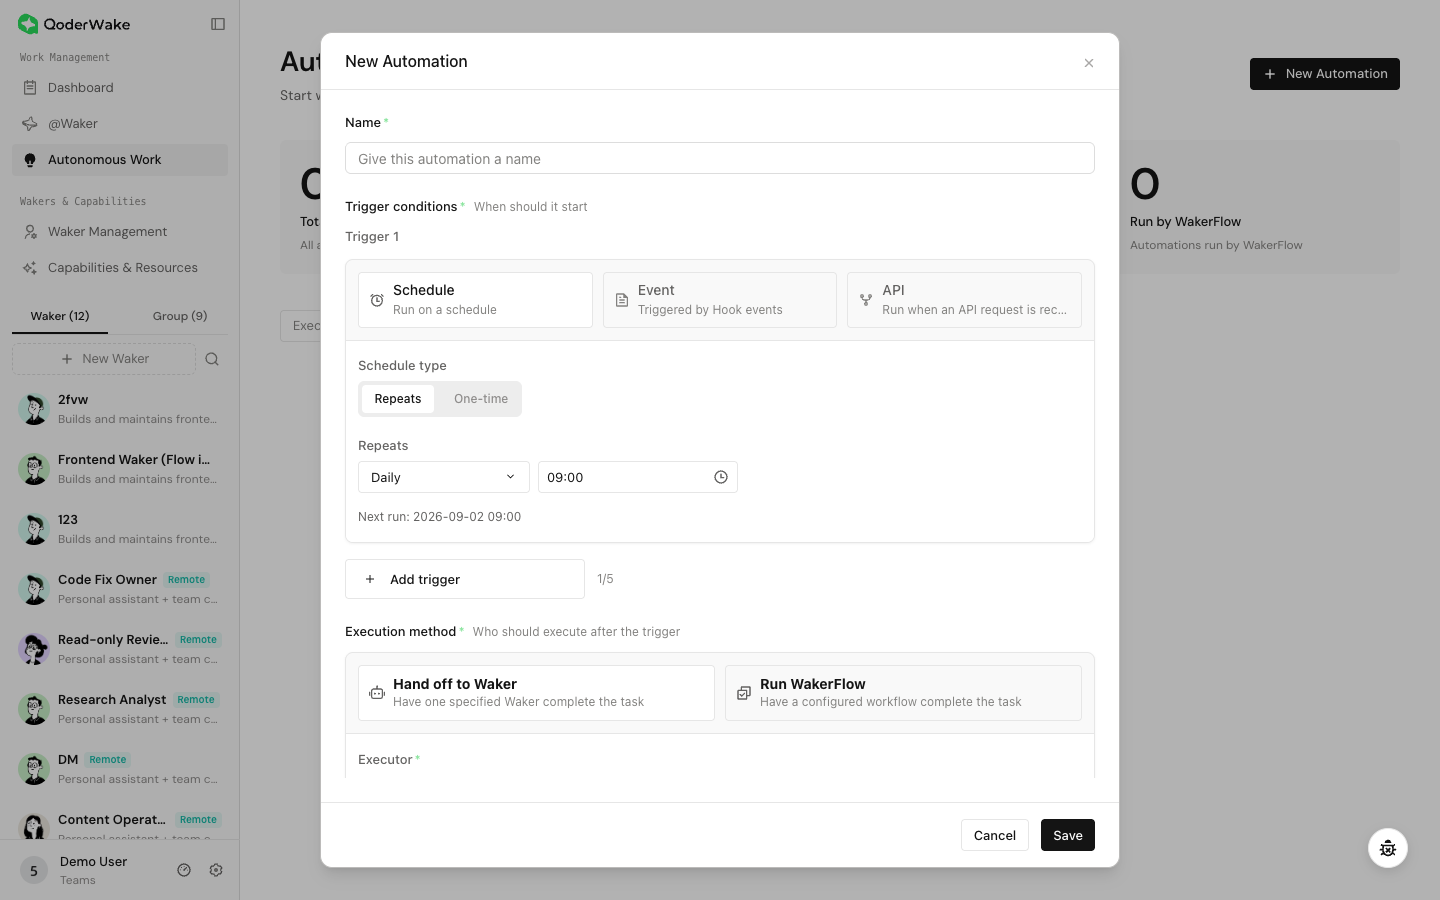
Schedule triggers are suitable for daily reports, weekly summaries, and recurring checks.
Event triggers respond to repository Issues, Pull Requests, or other supported connector events.
Use scheduled polling when a source cannot push events and the page exposes a polling trigger:
API triggers let a ticketing system, CI/CD pipeline, monitoring service, or business application start autonomous work on demand. The caller submits structured JSON; QoderWake resolves that data into the task description and dispatches it to the selected Waker or WakerFlow.
API requests use a personal access token (PAT) for Bearer authentication. Create one before integrating a caller:
The task description defines the stable instructions, while the request body supplies data for one invocation. For example:
Send the corresponding JSON payload:
Use the complete POST endpoint generated in task details. Payload substitution follows these rules:
By default, every API invocation starts a new task session. To continue work on the same ticket, alert, or business object, send the same top-level string field
If an endpoint is exposed, remove and add the API trigger again to obtain a new endpoint. If the PAT is also exposed, revoke and recreate it.
When Run WakerFlow is selected, the page shows the workflow stages and runtime parameters.
Automation has no operator to correct a mistaken path in real time. For code changes, document branch strategy, tests, output location, and prohibited deployment actions.
Check the trigger source and time, input, executor, workspace, process status, final result, and actual artifact. Begin troubleshooting at the first error rather than the final summary.
Open Autonomous Work
Path: left navigation → Autonomous Work. The page summarizes total tasks, active tasks, and tasks handled by Wakers or WakerFlows. Filter by response type, trigger type, and status.
From a Waker detail page, Work → Autonomous Work shows only tasks related to that Waker. A completed run only means execution ended; inspect the run input, process, result, and artifact before acceptance.
Check prerequisites
An autonomous task normally runs without a person present to add missing context. Check the following before creating one:
- Executor: The Waker is enabled and responds normally. For a WakerFlow, complete at least one successful manual run and verify its human-confirmation nodes and output.
- Model: The Waker's model is available. Select a specific model when repeatability matters, or use Auto to follow the system recommendation.
- Workspace: The Waker can access the required directory or project. A local directory requires the device, QoderWake, and directory to remain available when the trigger fires.
- Capabilities and access: Validate required Skills, connectors, network access, and external accounts in a normal chat first. Do not use a production automation as the first authorization test.
- Task boundary: Keep work that still needs repeated goal clarification in a chat. Prefer WakerFlow for multiple stages, fixed approvals, or human-confirmation steps.
Choose a trigger
| Trigger | Best for | First validation |
|---|---|---|
| Schedule | Daily or weekly reports, periodic checks, and one-time reservations | Set a run a few minutes ahead and verify timezone and next-run time |
| Event | External systems that push Issue, Pull Request, or other changes | Create one safe test event; inspect event activity before the task result |
| API | Ticketing, CI/CD, monitoring, or business systems that provide structured data | Use a test PAT and a JSON body without sensitive data |
| Scheduled polling, when available | Sources that cannot push events but can be queried for changes | Start at low frequency and verify filters and deduplication |
Create an autonomous task
- Select New Automation.
- Enter a name in the form “object + action + frequency or source.”
- Add one or more trigger conditions. A task can contain up to five triggers.
- Choose an execution method:
- Waker for stable work owned by one role.
- WakerFlow for multiple stages, parallel work, fixed handoffs, or structured input.
- Select the execution object and verify that it is enabled.
- When the response method is Waker, select Auto or a specific model. If that model becomes unavailable or is removed, edit and retest the task.
- Write the task description: recurring objective, input scope, output, and prohibited actions.
- Choose the default workspace, a local directory, or a project.
- Open advanced settings and configure maximum runs and an end date.
- Save, run manually, then test the real trigger before enabling production use.
Configure a schedule trigger
Schedule triggers are suitable for daily reports, weekly summaries, and recurring checks.
- Select Schedule.
- Choose recurring or one-time execution and set the date, time, and repeat rule.
- Verify the next-run time and business timezone.
- For the first test, schedule a run a few minutes ahead; switch to the final cadence only after success.
Configure an event trigger
Event triggers respond to repository Issues, Pull Requests, or other supported connector events.
- Select Event and authorize the event source.
- Select the repository or object.
- Choose the event type and source-specific filters, such as create, edit, repository, branch, label, or object scope. Available fields vary by source.
- Save and create a safe test event in the source system.
- In task details, check Event Activity or run history. First confirm that the event arrived, then confirm that it started exactly one expected task.
Configure scheduled polling, when available
Use scheduled polling when a source cannot push events and the page exposes a polling trigger:
- Select and authorize the source.
- Choose the object scope, filters, and polling interval.
- Define the initial time or cursor so the first run does not process all history accidentally.
- Use a stable object ID or update time for deduplication.
- Validate the full path: discover change → create task → advance cursor.
Configure an API trigger
API triggers let a ticketing system, CI/CD pipeline, monitoring service, or business application start autonomous work on demand. The caller submits structured JSON; QoderWake resolves that data into the task description and dispatches it to the selected Waker or WakerFlow.
Create a personal access token
API requests use a personal access token (PAT) for Bearer authentication. Create one before integrating a caller:
- Sign in to the Qoder Console and open the avatar or user menu.
- Go to Personal Settings → Service Integration.
- Create a personal access token. Use a name that identifies the caller and environment, such as
ticketing-production. - Copy the token immediately. It is normally shown in full only once; store it in the caller's credential manager or CI secret store.
- Validate the integration in a test environment, then create a separate production token. During rotation, verify the new token before revoking the old one.
Create the task and obtain its endpoint
- Create an autonomous task and add an API trigger.
- Select a Waker or WakerFlow, then configure the task description, workspace, and run limits.
- Save the task. From task details, copy the generated POST endpoint, authentication method, and request example.
- Protect the full endpoint like a credential. Do not construct it manually or include it in public logs or screenshots.
Design the task description and payload
The task description defines the stable instructions, while the request body supplies data for one invocation. For example:
- Use
{{field}}for a top-level field,{{ticket.id}}for a nested field, and{{items[0].name}}for an array element. - Field names are case-sensitive. If a path cannot be resolved, the placeholder remains in the task description so the mismatch is visible.
- Strings are inserted directly. Objects, arrays, numbers, booleans, and
nullare converted to JSON text. - If the task description has no placeholders, the fixed description remains and the complete request body is appended as input for that run.
One-off requests and continued sessions
By default, every API invocation starts a new task session. To continue work on the same ticket, alert, or business object, send the same top-level string field wakeSessionUniqueId in subsequent requests:
- Requests from the same user, autonomous task, and
wakeSessionUniqueIdreuse one session and run in order. - Omitting the field or changing its value starts a new session.
- This field preserves context; it is not an idempotency key. The caller must still implement retry and deduplication behavior.
- Use distinct values across customers, projects, data permissions, and security scopes to prevent context from crossing boundaries.
Verify the result
- Make the first request with a small, non-sensitive payload.
- Check the HTTP response. An accepted request only means execution has been dispatched; it does not mean the business task has completed.
- In Autonomous Work run history, verify that the trigger source is API and inspect the input, executor, workspace, and current status.
- Wait for completion, then inspect the final response, generated files, and actual result in the external system.
- After validation, configure the protected endpoint and PAT in the production caller.
Troubleshoot API triggers
| Symptom | What to check |
|---|---|
| HTTP 401 or 403 | Confirm that the PAT is valid for the current account and region, and that the header is Authorization: Bearer <YOUR_PAT> |
| Invalid endpoint or HTTP 404 | Copy the full endpoint again from task details; confirm that the task or API trigger was not deleted or recreated |
| Request accepted but no expected result | Inspect run history; verify task status, Waker/WakerFlow availability, and any local device or directory dependency |
| Placeholder was not replaced | Compare JSON nesting, field-name case, and array indexes with the task description |
| Wrong context was reused | Check whether one wakeSessionUniqueId was shared by unrelated business objects |
| A retry caused duplicate execution | Add caller-side deduplication; do not treat wakeSessionUniqueId as an idempotency key |
Run a WakerFlow
When Run WakerFlow is selected, the page shows the workflow stages and runtime parameters.
- Select a WakerFlow that has already passed a manual run.
- Review phases and human confirmation nodes.
- Configure an override method and value for every runtime parameter.
- Verify required fields and output compatibility.
Configure the workspace
| Workspace | Use | Requirement |
|---|---|---|
| Default | Work without fixed files | Do not assume a local repository |
| Local directory | Files on a specific machine | Device online and directory permission valid |
| Project | A maintained repository or documentation set | Correct visibility, branch, and write scope |
Advanced settings
- Maximum runs: unlimited or a custom number. The task pauses when the limit is reached.
- End date: never or a specified date. No new trigger starts after that date.
Test before rollout
- Use Run now to validate the executor, task description, workspace, and capabilities.
- Test the actual trigger with a near-term schedule, safe event, or API request.
- Inspect trigger source, input, current step, final result, and artifact.
- Confirm that high-risk actions still pause for approval.
- Remove test data, then enable the production trigger.
Inspect run records
Check the trigger source and time, input, executor, workspace, process status, final result, and actual artifact. Begin troubleshooting at the first error rather than the final summary.
Edit, pause, copy, and delete
- The response method and selected Waker or WakerFlow are locked when editing an existing task. To change the executor, use Copy, validate the new task, then pause or delete the old task.
- Retest after changing triggers, model, workspace, permissions, or connectors.
- Copying does not copy the accumulated run count or run history. After copying, verify the name, trigger scope, project, model, and token so two tasks do not process the same event.
- Pausing prevents new automatic triggers but does not stop a run already in progress.
- Not every event-triggered task supports Run now; use a safe event from its external source for validation.
- Before deletion, preserve required run records and stop external systems from calling the endpoint.
Common issues
| Symptom | Check order |
|---|---|
| Schedule did not run | Status → next run/timezone → limits → device/workspace |
| Event did not run | Source authorization → object → event type → activity |
| API authentication or payload error | Current endpoint → PAT → Content-Type → JSON fields |
| Run fails immediately | Waker/WakerFlow → workspace → model → Skill/connector |
| Workflow parameter is empty | Workflow input → override method → trigger field |
| Completed but artifact is wrong | Run details → description → output location → actual object |