

This guide is for customers activating the Qoder CN (Suite) Enterprise VPC Edition. It explains the product, how it differs from standard editions, the function of a dedicated domain link, and how to configure the link for Qoder CN IDE, the Qoder CN JetBrains plugin, QoderWork CN, and the Qoder CN CLI.
This guide walks you through the complete onboarding process, from understanding the Enterprise VPC Edition and obtaining your dedicated domain, to configuring your clients and verifying a successful connection.
The Qoder CN (Suite) Enterprise VPC Edition is a dedicated instance deployed on the Alibaba Cloud public cloud for enterprise customers. Unlike standard editions that use a shared public entry point, the Enterprise VPC Edition provides your organization with a dedicated service instance and access point.
The Enterprise VPC Edition supports connections to an Alibaba Cloud Virtual Private Cloud (VPC) through a dedicated connection, providing an access method suitable for enterprise networks. For customers who require internal network access, dedicated connections, access control, security compliance, or data boundaries, the Enterprise VPC Edition offers an ideal deployment and usage model.
A dedicated domain link is the exclusive entry point for accessing the Qoder CN management console and related services.
The dedicated domain link is used in the following scenarios: an administrator accesses the Organization Settings page to configure members, seats, and the enterprise instance; an enterprise member accesses their personal account page to view usage details; and it is required for clients, plugins, or command-line tools to connect to the dedicated Enterprise VPC instance.
For example, an enterprise member can view their personal usage details at the following address:
An administrator can access the organization settings page at the following address:
The placeholders {dedicated-domain} and {orgid} are for illustration only. Replace them with the actual dedicated domain and organization ID from your enterprise administrator.
Perform the following steps as an Alibaba Cloud primary account or an authorized RAM user:
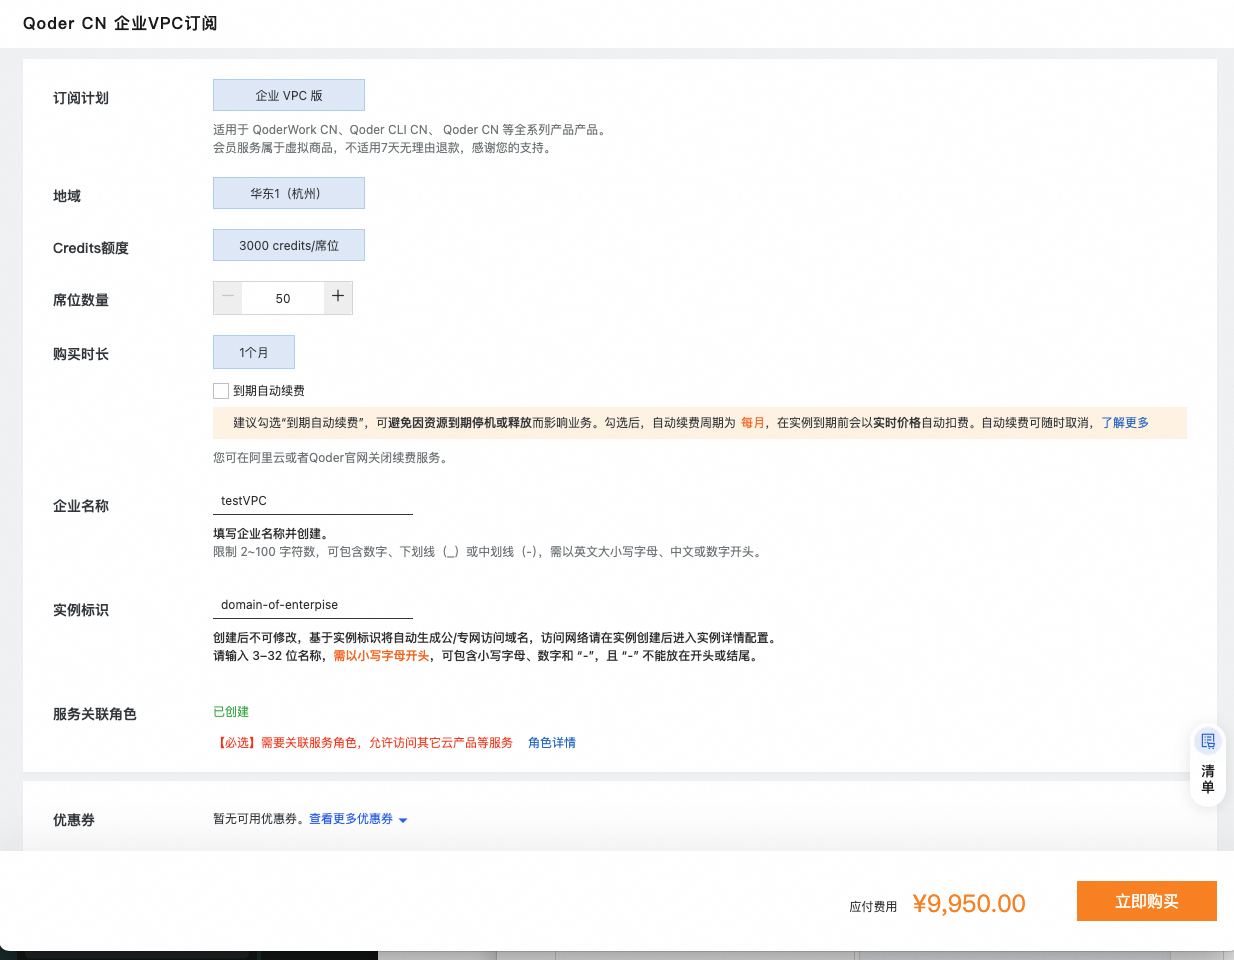
To purchase or initialize the Qoder CN (Suite) Enterprise VPC Edition, you must have the required service-linked role (AliyunServiceRoleForqodercnEnterpriseVPC). If you use a RAM user for the purchase, the Alibaba Cloud account must grant the RAM user the AliyunQoderCNFullAccess and AliyunBSSOrderAccess permissions.
When purchasing or initializing the Qoder CN (Suite) Enterprise VPC Edition, you must specify an enterprise name and a dedicated domain for the dedicated instance.
After the instance is created, the enterprise administrator can view the domain configuration for the instance in the Alibaba Cloud Qoder CN console.
The dedicated domain is a critical identifier for your Enterprise VPC instance and cannot be changed after creation. If you need to adjust the access experience, you can modify the domain's access method, such as choosing between public or private network access, but you cannot change the domain name itself.
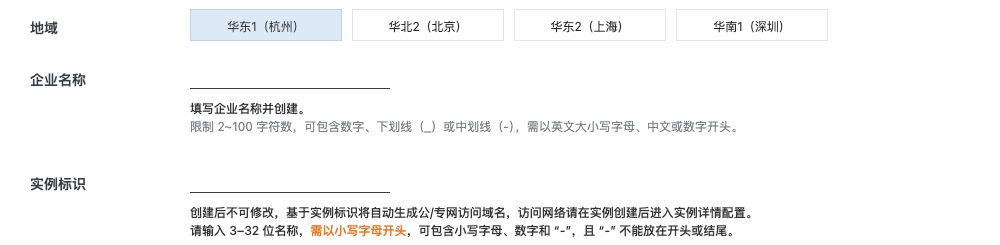 On the purchase page, the domain-related field is 实例标识 (instance identifier). The page states that it cannot be changed after creation and is used to generate public/private access domains. Configure access networking in the instance details after creation.
You can find the domain through either the Alibaba Cloud console or the management console:
If you do not know your dedicated domain, you can obtain it in one of the following ways:
You must use Qoder CN IDE v1.4.2 or later and the Qoder CN JetBrains plugin v3.2.3 or later. Confirm that your clients meet these version requirements before you proceed.
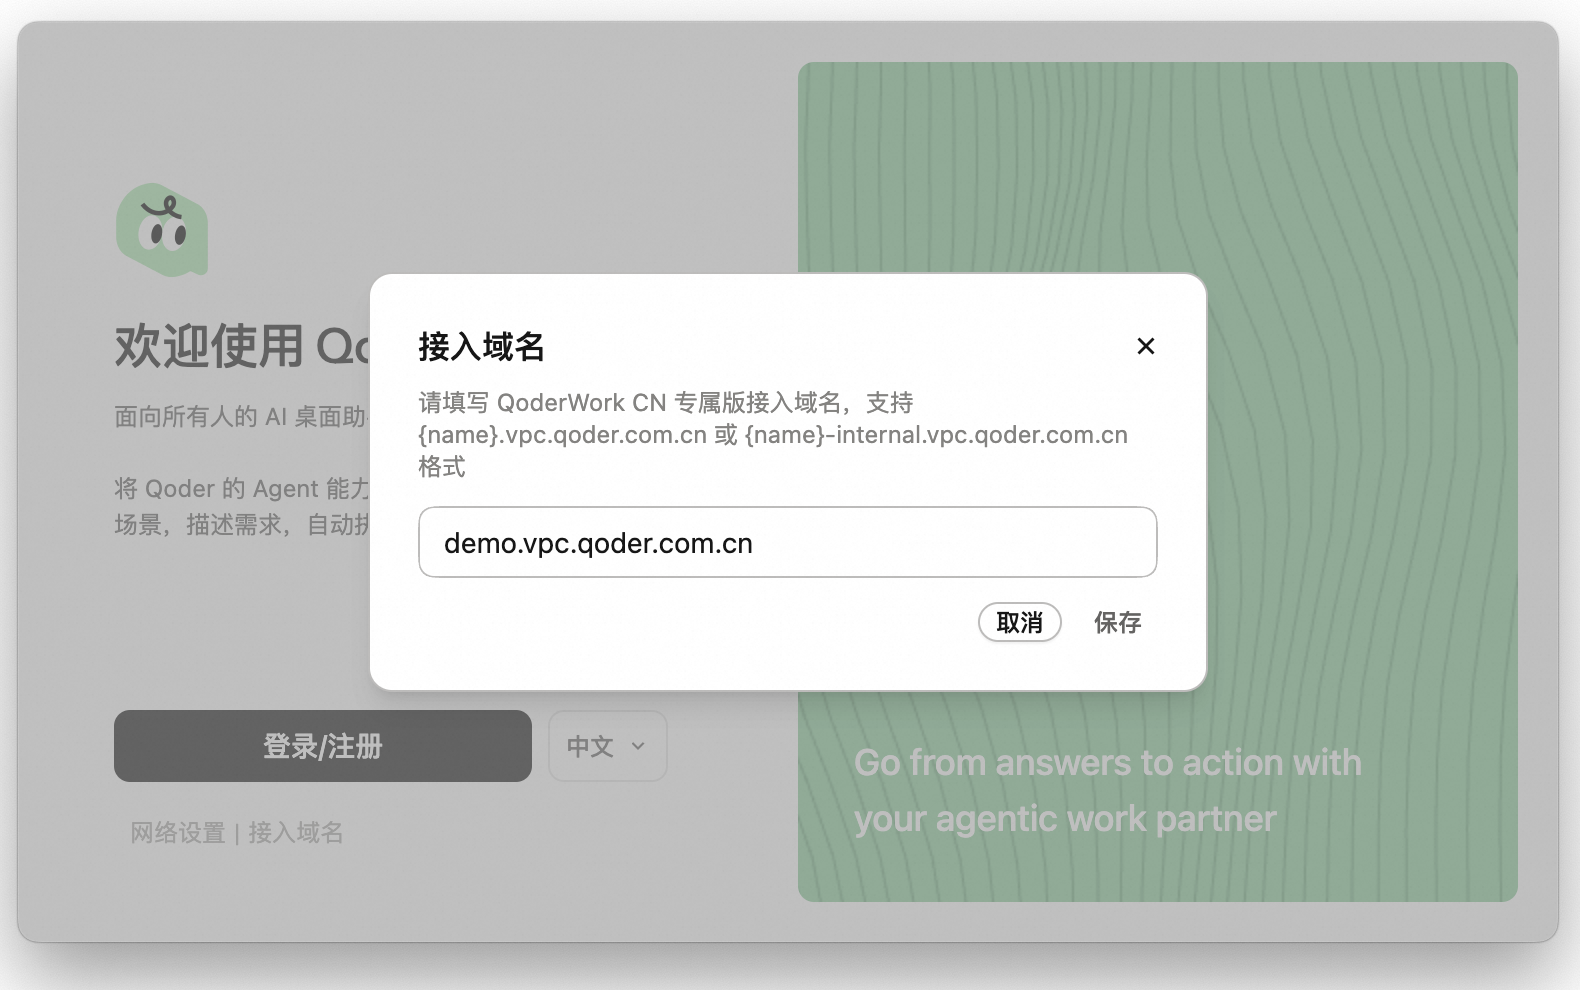
You must use QoderWork CN v0.6.5 or later. Confirm that your client meets this version requirement before you proceed.
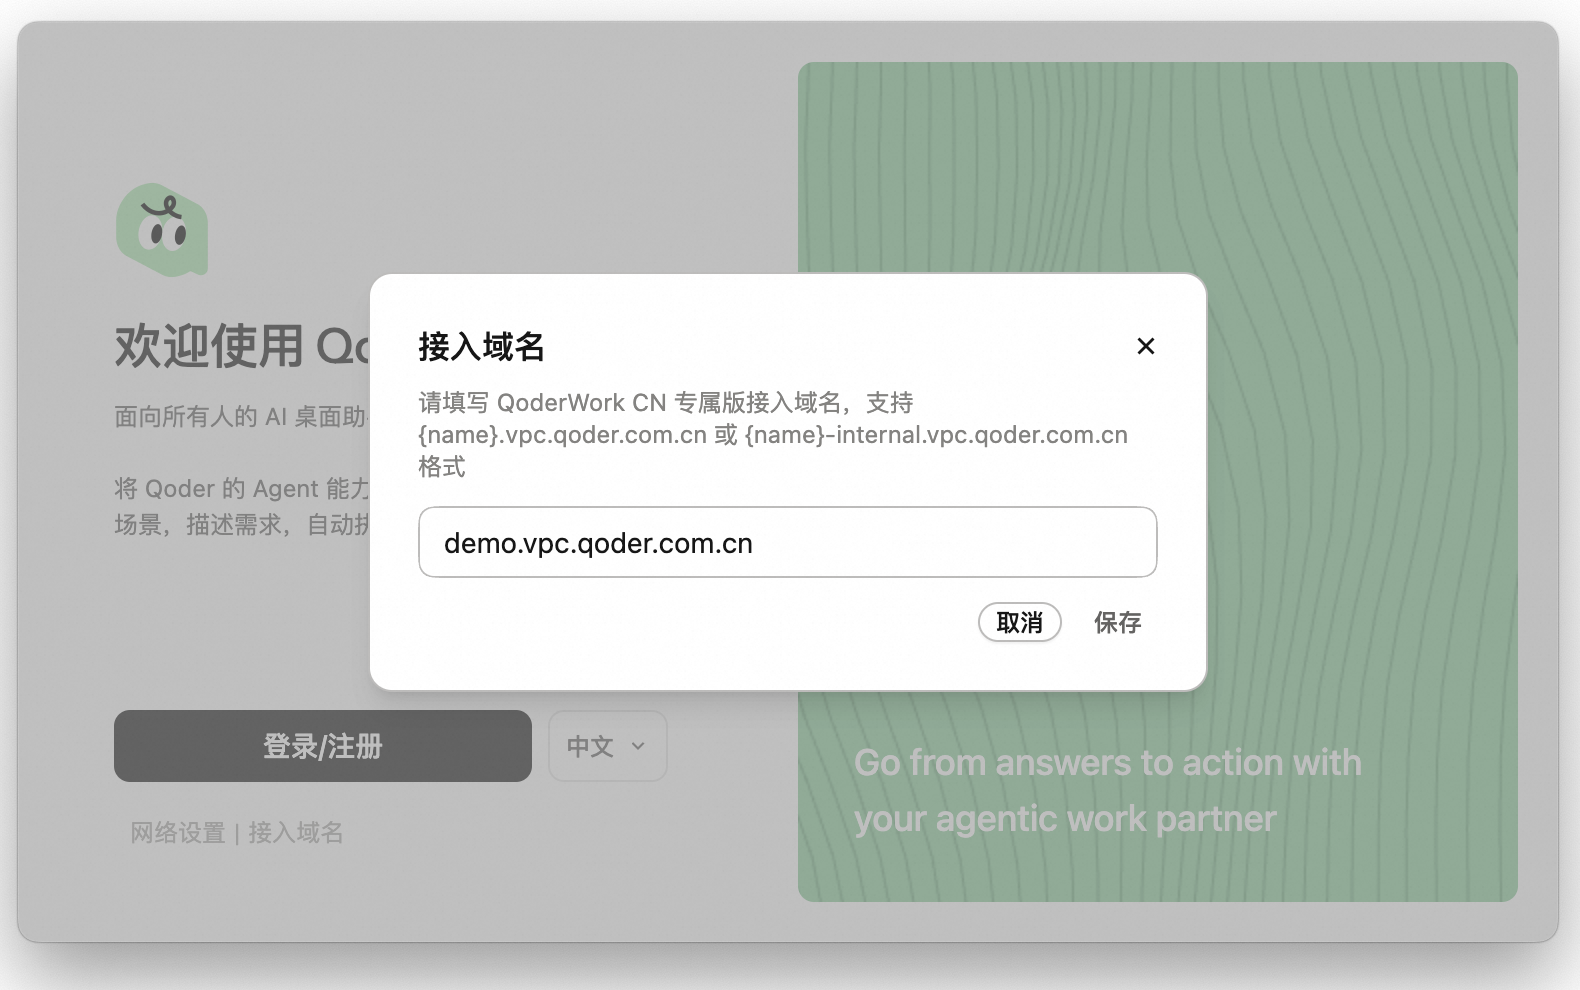
In QoderWork CN, if you are not logged in, click Access Domain below the login button.
You must use Qoder CN CLI v1.0.32 or later. Confirm that your CLI meets this version requirement before you proceed.
If you are not logged in, run the following command to set the service address for the Qoder CN CLI:
Replace {dedicated_domain_or_url} with the actual dedicated domain provided by your enterprise administrator. After configuration, log in again or refresh your authentication status, and then run a command to verify the connection to your Enterprise VPC instance.
Yes. If you need to access your Enterprise VPC instance through Qoder CN IDE, the Qoder CN JetBrains plugin, QoderWork CN, or the Qoder CN CLI, you must configure each client with the same dedicated domain link.
Check the following:
Enterprise VPC supports monthly and annual subscriptions. Credits are issued monthly rather than allocated for an entire year at once. See Enterprise Credits sharing.
The Configuration Administrator has no Credits and is used only for purchasing and configuration. Actual users need member seats and must sign in through the enterprise entry point.
Instances are released immediately upon expiration. To continue, create a new instance using the purchase entry above, select Existing organization, and enter the original organization ID. Binding requires no active subscription on the organization. See Impact of order expiration.
After purchase, check the new instance and organization ID, then verify the enterprise domain and network using this guide. An old address alone does not establish that the new instance is ready. Binding the organization does not mean that network resources or all old instance data are automatically restored.
If the organization has Credits but a member cannot use the product, check personal and applicable group limits. See Shared Credits and limits.
Where should you start?
- Before purchasing: check permissions, seat count, and the enterprise domain before creating an instance.
- Already purchased: get the enterprise domain, then configure the clients you need.
- Organization member: obtain the enterprise entry from your administrator and confirm membership. You do not need to purchase another instance.
- Original instance expired: read Repurchase for the original organization before checking the domain and network connection.
Qoder CN (Suite) Enterprise VPC Edition
The Qoder CN (Suite) Enterprise VPC Edition is a dedicated instance deployed on the Alibaba Cloud public cloud for enterprise customers. Unlike standard editions that use a shared public entry point, the Enterprise VPC Edition provides your organization with a dedicated service instance and access point.
The Enterprise VPC Edition supports connections to an Alibaba Cloud Virtual Private Cloud (VPC) through a dedicated connection, providing an access method suitable for enterprise networks. For customers who require internal network access, dedicated connections, access control, security compliance, or data boundaries, the Enterprise VPC Edition offers an ideal deployment and usage model.
Dedicated domain link
A dedicated domain link is the exclusive entry point for accessing the Qoder CN management console and related services.
The dedicated domain link is used in the following scenarios: an administrator accesses the Organization Settings page to configure members, seats, and the enterprise instance; an enterprise member accesses their personal account page to view usage details; and it is required for clients, plugins, or command-line tools to connect to the dedicated Enterprise VPC instance.
For example, an enterprise member can view their personal usage details at the following address:
Create and purchase an instance
Perform the following steps as an Alibaba Cloud primary account or an authorized RAM user:
- Log on to the Alibaba Cloud console and navigate to the Qoder CN console Qoder CN (Suite) Enterprise VPC Edition page.
- Click Create Enterprise, or go directly to the purchase link.
Purchase permission requirements
To purchase or initialize the Qoder CN (Suite) Enterprise VPC Edition, you must have the required service-linked role (AliyunServiceRoleForqodercnEnterpriseVPC). If you use a RAM user for the purchase, the Alibaba Cloud account must grant the RAM user the AliyunQoderCNFullAccess and AliyunBSSOrderAccess permissions.
Dedicated domain creation and limitations
When purchasing or initializing the Qoder CN (Suite) Enterprise VPC Edition, you must specify an enterprise name and a dedicated domain for the dedicated instance.
After the instance is created, the enterprise administrator can view the domain configuration for the instance in the Alibaba Cloud Qoder CN console.
The dedicated domain is a critical identifier for your Enterprise VPC instance and cannot be changed after creation. If you need to adjust the access experience, you can modify the domain's access method, such as choosing between public or private network access, but you cannot change the domain name itself.
Purchase conditions
- You must purchase a minimum of 50 seats. Each seat includes 3,000 credits per full subscription period.
- If your credit balance is insufficient, purchase an enterprise shared resource pack for the specified enterprise instance. The enterprise administrator can set usage limits on the enterprise shared resource pack for different members in the Qoder CN management console.
Find the dedicated domain
Enterprise administrators
You can find the domain through either the Alibaba Cloud console or the management console:
- Through the Alibaba Cloud console
Log on to the Qoder CN console, go to Qoder CN (Suite) > Enterprise VPC Edition, click the target instance in the instance list, and then go to the Network Configuration tab to view the domain. The direct URL is https://qoder.console.aliyun.com/instances/enterprisevpc. - Through the management console
On the instance list or details page, click Passwordless login to Qoder management console. The dedicated domain appears in your browser's address bar.
Enterprise members
If you do not know your dedicated domain, you can obtain it in one of the following ways:
- Contact your enterprise administrator to get the login address for the Enterprise VPC Edition.
- Check the invitation email from your administrator and find the domain in the link from the email.
Configure the dedicated domain
Qoder CN IDE and JetBrains plugin
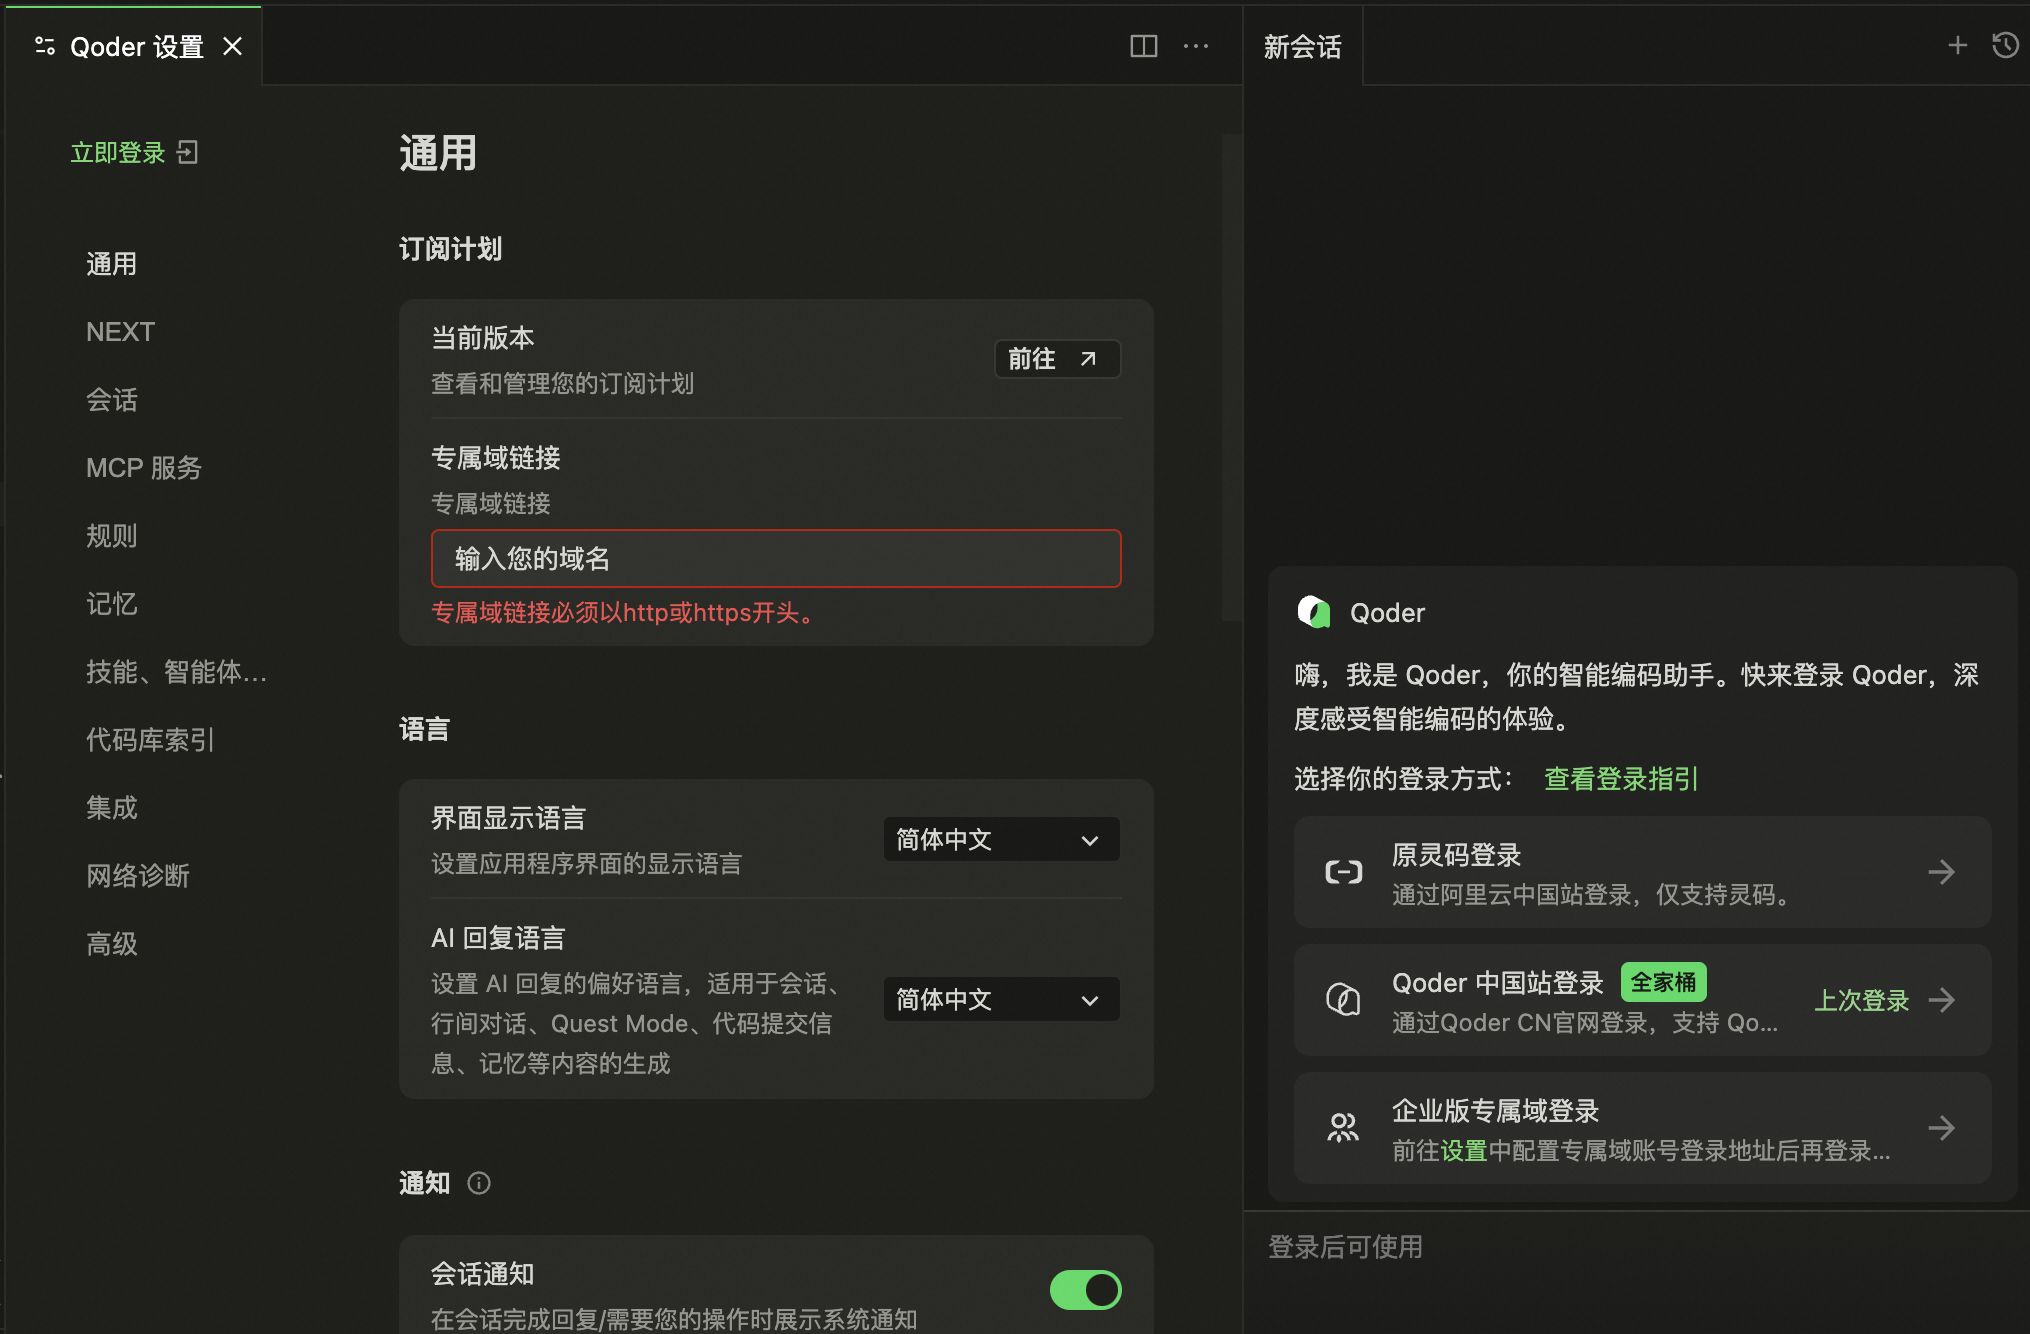
You must use Qoder CN IDE v1.4.2 or later and the Qoder CN JetBrains plugin v3.2.3 or later. Confirm that your clients meet these version requirements before you proceed.
- In Qoder CN IDE, if you are not logged in, go to the Settings page. Navigate to General -> Subscription Plan -> Dedicated Domain Link, and enter the dedicated domain link provided by your enterprise administrator. After configuration, click Log in with Enterprise Dedicated Domain.
- In the Qoder CN JetBrains plugin, if you are not logged in, open IDE Settings. Go to the Qoder CN plugin configuration page, find the Service Address or Enterprise Dedicated Domain field, and change it to your dedicated domain link. After configuration, we recommend that you re-authenticate or refresh your login status to ensure the plugin connects to your Enterprise VPC instance.
QoderWork CN
You must use QoderWork CN v0.6.5 or later. Confirm that your client meets this version requirement before you proceed.
In QoderWork CN, if you are not logged in, click Access Domain below the login button.
Qoder CN CLI
You must use Qoder CN CLI v1.0.32 or later. Confirm that your CLI meets this version requirement before you proceed.
If you are not logged in, run the following command to set the service address for the Qoder CN CLI:
FAQ
Configuration for all clients
Yes. If you need to access your Enterprise VPC instance through Qoder CN IDE, the Qoder CN JetBrains plugin, QoderWork CN, or the Qoder CN CLI, you must configure each client with the same dedicated domain link.
Troubleshooting connection issues
Check the following:
- Verify that the dedicated domain link is entered correctly.
- Verify that your network can access the Enterprise VPC instance.
- Check if you need to connect through a corporate VPN, proxy, or dedicated connection.
- Confirm that your account has been added to the corresponding enterprise organization.
- Ensure your client version meets the minimum requirements.
- Try logging in again or restarting the client after saving the configuration.